Are you ready to share your thoughts with the world and potentially earn money through blogging? Creating a blog on Blogger, Google’s free blogging platform, is a fantastic way to get started. In this guide, we’ll walk you through some basic steps on how to create a blog on Blogger. Let’s begin!
Blogger vs. Blogspot: Understanding the Difference
Before diving into the setup process, it’s essential to understand the distinction between Blogger and Blogspot. Blogger is the free blogging platform provided by Google, while Blogspot is a free domain service provider integrated into the Blogger platform. Both are owned by Google, and by default, Blogger hosts your blog on the Blogspot domain.
Pros and Cons of Using Blogger
Although Blogger might seem perfect for beginners, it’s important to consider the advantages and disadvantages of using it as your platform. Here’s what you should keep in mind:
Pros:
- Completely free to use
- Blogs get indexed fast by Google, often appearing in search results within 24 hours
- User-friendly interface, making it easier to navigate than other platforms like WordPress
- Includes a free SSL certificate
- Secure and dependable platform
- Seamlessly integrates with various Google products
- Offers opportunities for additional income through display ads
Cons:
- Limited customization options compared to other platforms
- Limited selection of themes and templates
- Lack of built-in eCommerce features or plugins
- Google retains full control over your blog
- Poor customer support, particularly regarding recent updates
How to Create a Blog on Blogger
- Sign in to Blogger at http://www.blogger.com/home with your Gmail account or create one for free if you don’t have an account already. Gmail account is necessary as Google owns Blogger.
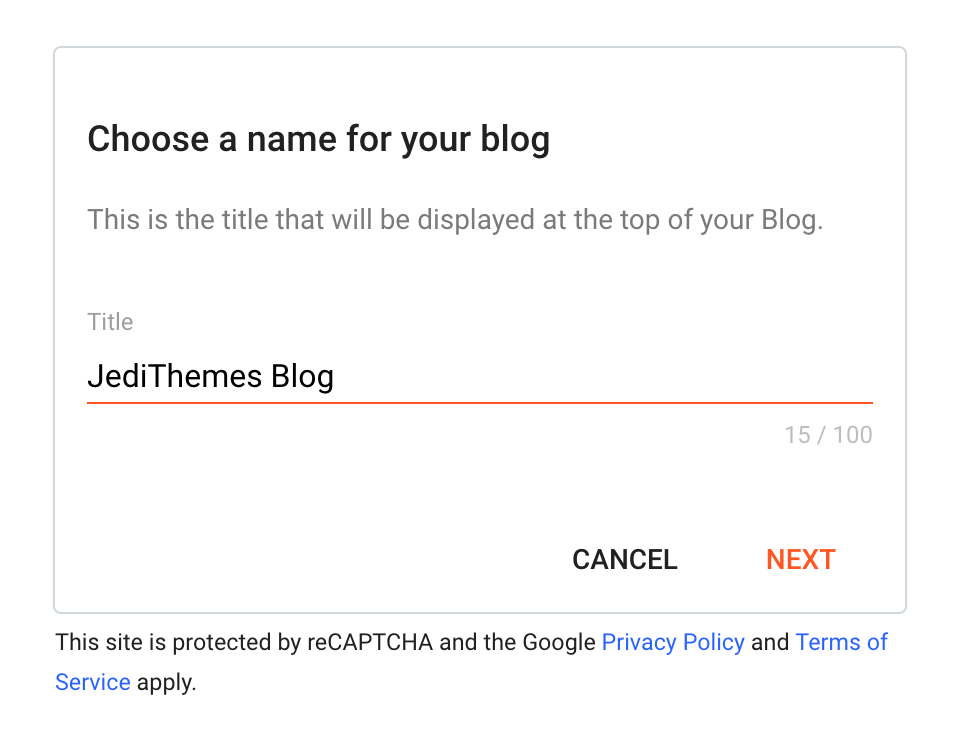
- Choose a name for your blog: Select a catchy and unique name for your blog that reflects its content and purpose.
- Choose a URL for Your Blog: Your domain name must be unique, so you may need to try different options until you find one that’s available.

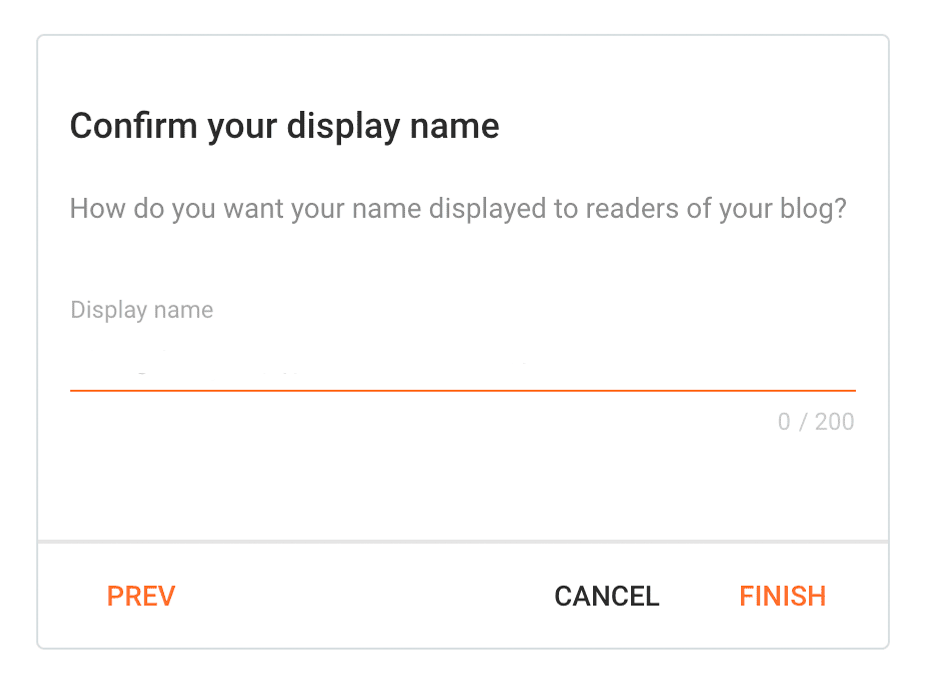
- Confirm Your Display Name: Customize your display name, including relevant keywords to improve your blog’s visibility.
- Visit Your Website: Enter your blog’s address in your browser to see how it looks. You can customize the design later to make it more professional.
How to Change a Theme on Blogger
Changing your theme on Blogger is easy:
- Navigate to “Theme” in the left-hand menu.
- Scroll through the available themes to find the one you like.
There’s a wide variety of Blogspot themes to choose from. We suggest considering Contempo, Soho, Emporio, Notable, or Essential. You can preview each theme before applying it.
Additionally, for those seeking more advanced options and beautiful designs, you can check out our premium Blogger templates available for purchase at JediThemes.
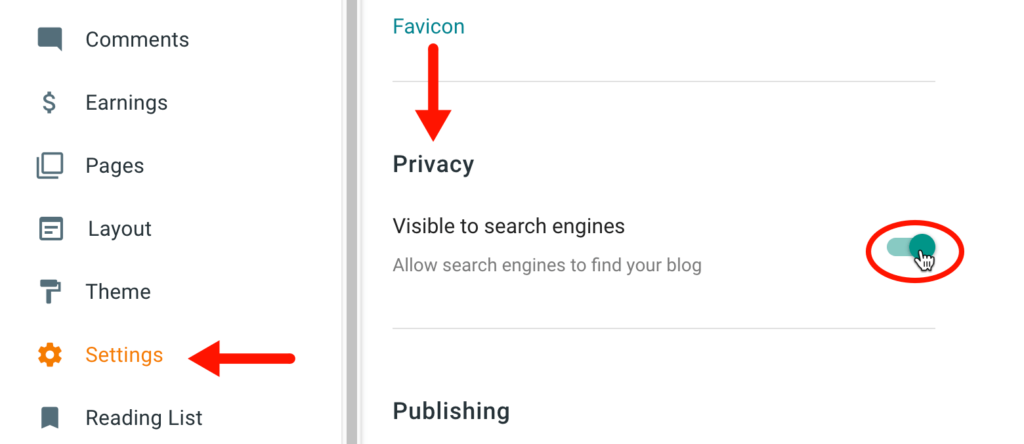
Check Blog Visibility in Privacy Settings
To make sure your blog is visible to search engines, it’s crucial to verify your blog’s Privacy Settings:
- From your Blogger dashboard, access “Settings”.
- Scroll down to the “Privacy” section.
- Ensure that “visible to search engines” setting is switched on.
How to Add a Favicon
A favicon is the small image that appears in the browser tab when you visit a website. To change the default favicon on your Blogger site, follow these simple steps:
- Navigate to Settings > click “Favicon”.
- Upload a square image that is less than 100 KB in size.
- Save your changes.
How to Add Gadgets
You can use gadgets to display archives, labels, or your profile on every page. Gadgets can be added and edited from the Layout section.
- Navigate to Layout in the left menu.
- Click on Add a Gadget in the desired area.
- Select the gadget from the pop-up window.
- Save your changes by clicking Save in the lower-left corner.
- To adjust a gadget’s settings, click Edit.
How to Create New Pages for Your Blog
Creating new pages for your blog on Blogger allows you to showcase static content like “About” or “Contact” tabs at the top or as sidebar links. To add a new page:
- Log in to your Blogger account.
- Choose your blog from the top left dropdown menu.
- Go to the Pages section in the left-hand menu.
- Click on the “+New Page” button.
- Enter the title and add your content.
- You can choose to turn off reader comments if you want.
- Before publishing, preview your page by clicking “Preview” in the top right.
- Once you’re happy with it, hit publish!
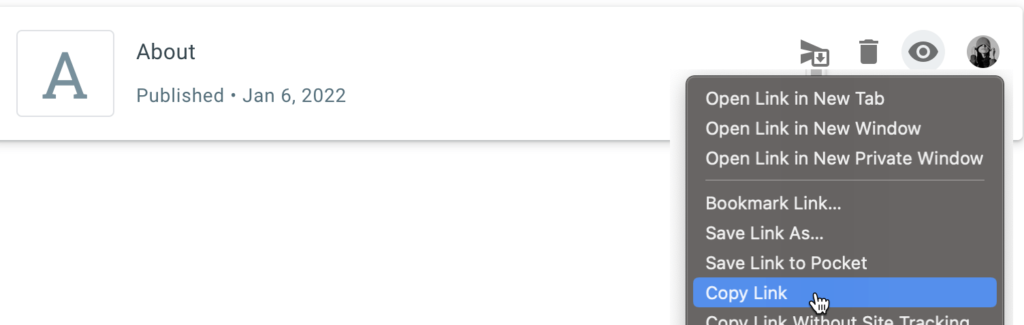
Note: To copy the URL, simply right-click on the eye icon and choose “Copy link” from the menu.
How to Display your Pages
- Log in to your Blogger account.
- Choose your blog from the top left dropdown menu.
- Select “Layout” from the left-hand menu.
- Click “Add a Gadget” in your desired section.
- Click “Pages”, then click “ADD A NEW ITEM”.
- Configure your page by typing a title and adding your link. Click “Save.”
- Finally, click “Save” in the bottom-right corner to confirm.

Note: To include a link to an external website, repeat the steps and simply input the external site’s link in the “Page URL” field.
Adding Labels
You have the option to include labels on your posts, which serve as categories or tags. These labels are visible on your blog posts, and when clicked by a reader, they navigate to a page displaying all posts with that particular label. To simplify navigation for your audience, you can utilize a label gadget within Blogger to incorporate labels into your blog’s sidebar.
Here’s how you can do it:
- Navigate to the Post settings in the sidebar.
- Choose “Labels” from the drop-down menu.
- A box will appear, allowing you to input relevant labels for your post.
Setting Permalinks
As you learn how to create a blog on Blogger, you’ll discover that you can customize the permalink structure of your blog posts to maintain short and user-friendly URLs. To set the desired permalink structure:
- Access the Post settings while creating your post.
- Select “Permalink” which will reveal the Automatic and Custom Permalinks options.
- Choose the Custom Permalink option.
Switch to a Custom Domain
In this guide, we covered how you can choose a free Blogspot domain with the “blogspot” suffix. However, if you prefer, you can invest in a custom domain. Just head to Settings » Publishing, select “Custom domain,” and input your purchased domain name.
Track Website Traffic
Accessing “Stats” allows you to track your website’s traffic in real-time, providing valuable insights into traffic sources, audience demographics, and popular content. Additionally, you can identify top-performing posts/pages and relevant keywords.
Edit HTML
You can customize your blog’s appearance by editing the HTML code. Simply navigate to Theme » Customize » Edit HTML to open the theme editor and modify your template. Here you can experiment with header and footer scripts to explore additional customization options.
Monetize Your Blog
You can monetize your Blogger-based website or blog in two ways:
- Adding ads through Blogger themes: Use theme settings to show ads on every page of your site.
- Putting ads on specific blog post pages: This is helpful if you want to try out different ad formats or keep certain pages ad-free.
Conclusion
Starting your journey on how to create a blog on Blogger is a straightforward process that offers numerous benefits, especially for beginners. With its user-friendly interface and integration with Google products, Blogger provides an excellent platform for expressing yourself and sharing your ideas with the world. So, what are you waiting for? Start your blogging journey on Blogger today!