
Looking to learn how to make a WordPress website but unsure where to start? Creating a website might feel overwhelming, particularly if you’re not familiar with technical aspects. However, fret not! Our comprehensive guide, tailored for beginners, is designed to simplify the process. Rest assured, you’ll be equipped to create a stunning website without diving into coding complexities.
Why Choose WordPress?
WordPress stands out for its adaptability, offering endless options for customization and a user-friendly experience that draws in a large community of enthusiasts. As a platform, it dominates the internet, powering more than 44% of websites and benefiting from a wealth of tips and tricks shared by respected developers daily. While WordPress itself is free, there are associated costs like hosting, plugins, and domain registration to keep in mind. Thankfully, newcomers to WordPress can tap into ample support and guidance to navigate the platform effectively.
What You Need to Get Started
Before diving into the website creation process, let’s ensure you have everything you need:
- Domain Name: This is your website’s unique address on the internet (e.g., yourwebsite.com).
- WordPress Hosting: Secure a reliable hosting provider to store your website files.
- 45 Minutes of Your Time: Dedicate a brief moment of your day to embark on this exciting journey.
How Much Does It Cost?
The cost of building a WordPress website varies depending on your requirements. Here’s a breakdown:
- Personal Website: As low as $100.
- Business Website: Ranges from $100 to $30,000 per year.
We recommend starting small and gradually expanding your website’s features as your needs evolve. In this guide, we’ll demonstrate how to build a website for less than $100, ensuring affordability without compromising quality.
Step 1: Website Setup
Choosing the right website platform is crucial, and we highly recommend a self-hosted WordPress.org site for its unparalleled capabilities. WordPress is free to download and use, giving you full control over your website’s design and functionality.
But Wait, Where’s the Cost Coming From?
While WordPress itself is free, you’ll incur expenses for a custom domain name and web hosting services. A domain name serves as your website’s online address, allowing users to access it through their browsers. Hosting, on the other hand, provides the virtual space for storing your website’s files, essentially serving as its online home.
Typically, a domain name costs around $14.99 per year, while hosting packages start at $7.99 per month. These expenses can add up, especially for beginners just embarking on their online journey.
Fortunately, Bluehost extends a generous offer to users, providing a complimentary domain name and offering over 60% off on web hosting services. As one of the leading hosting companies globally and an endorsed WordPress partner, Bluehost boasts extensive experience in catering to WordPress users since 2005, demonstrating a commitment to supporting and contributing to the WordPress community.
Let’s Get Started
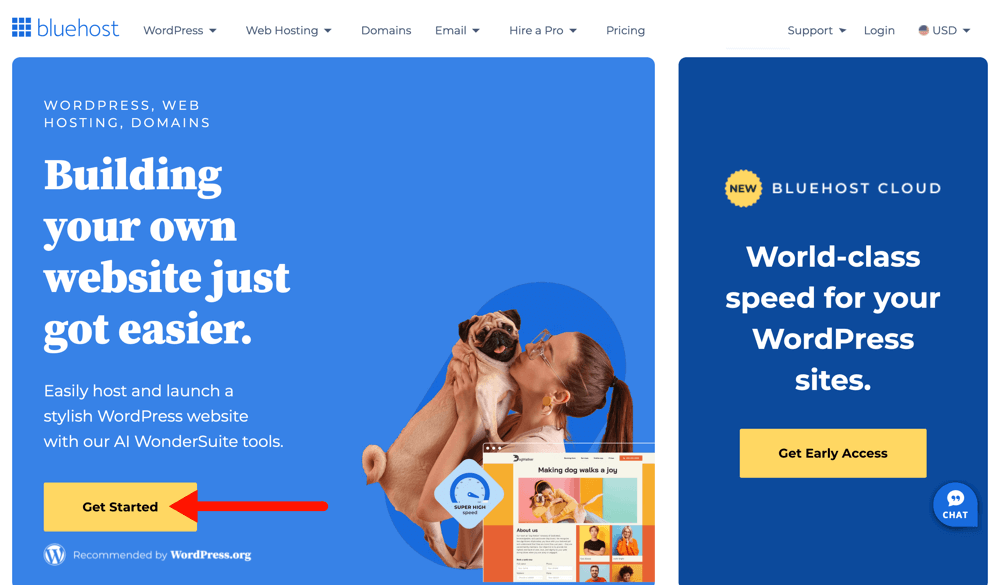
To begin, open a new browser window and head over to the Bluehost website. Click on the inviting yellow ‘Get Started’ button.
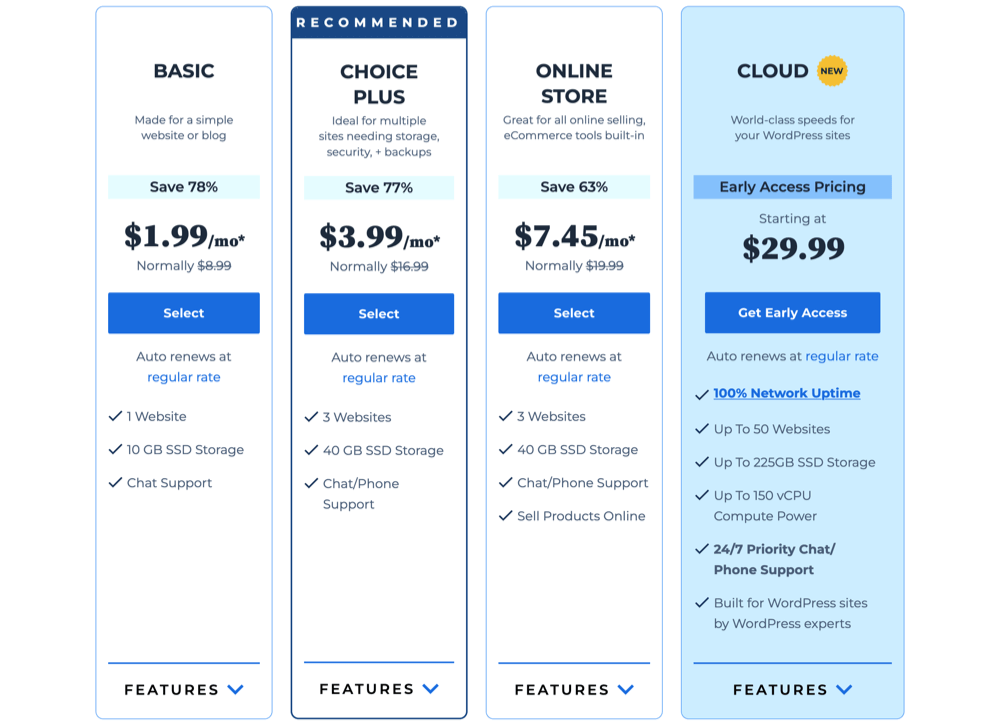
On the pricing page, select a hosting plan that suits your needs. The Basic and Choice Plus plans are popular choices among users. Once decided, click ‘Select’ to proceed.
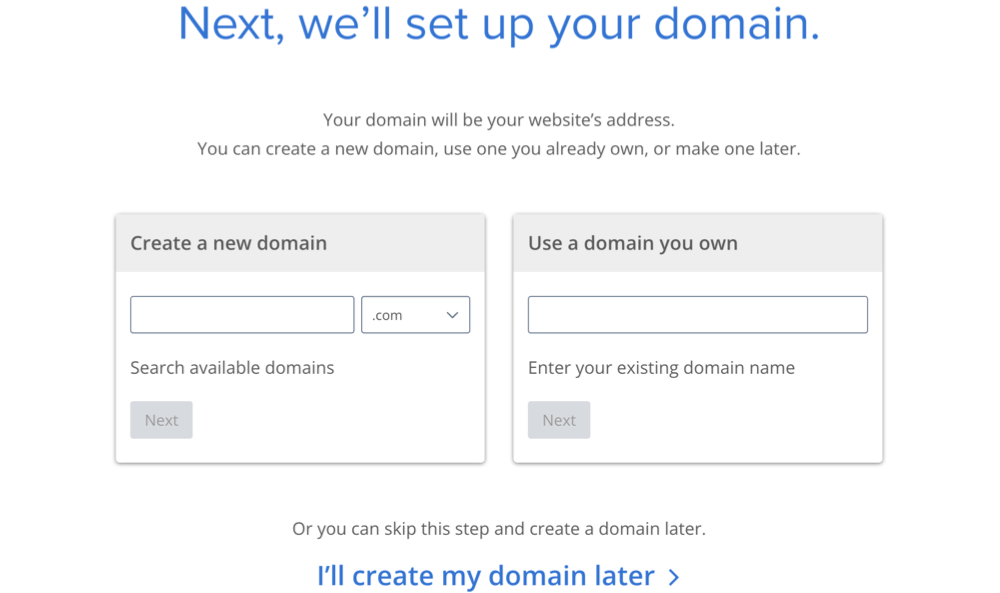
Now, it’s time to choose a new domain name. Opt for a .com domain that aligns with your business, ensuring it’s easy to pronounce, spell, and remember. Click ‘Next’ after finalizing your choice.
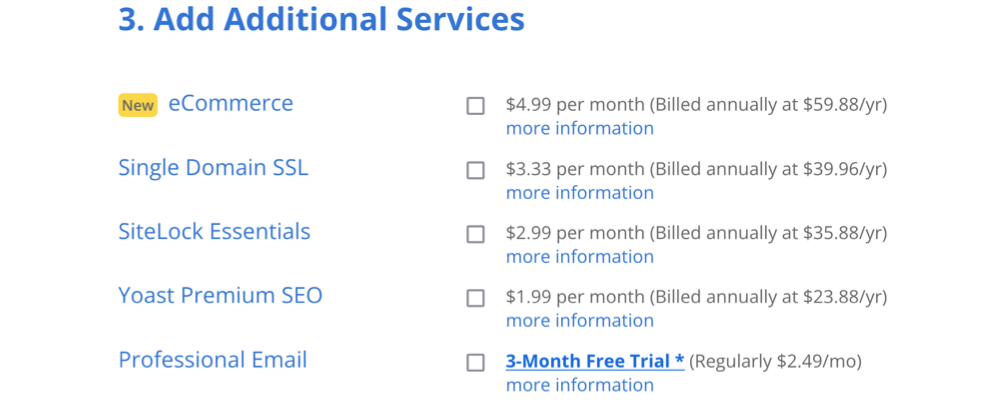
On the next screen, fill in your account information, including name, address, and email. While additional services are available, we generally don’t recommend purchasing them at this stage.
Complete the purchase by adding your payment information. Upon completion, you’ll receive an email containing login details for your web hosting dashboard.
This dashboard serves as your control panel for managing various aspects of your hosting account, from support to setting up emails. Most importantly, it’s the gateway to learning how to create a WordPress website in the next chapter.
Step 2: Install WordPress
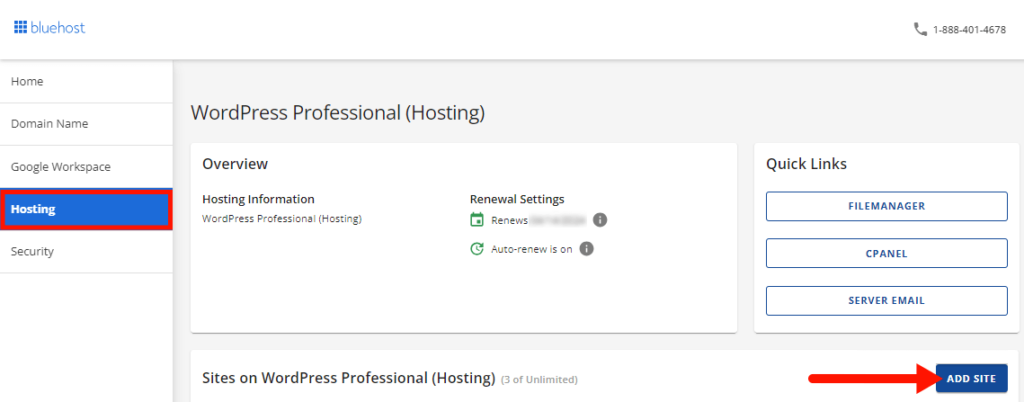
Thanks to Bluehost’s one-click WordPress installer, setting up WordPress is a breeze. Here’s how it works: after logging in to your Bluehost account, navigate to the “Hosting” tab on the left-hand menu and click the “Add Site” button.
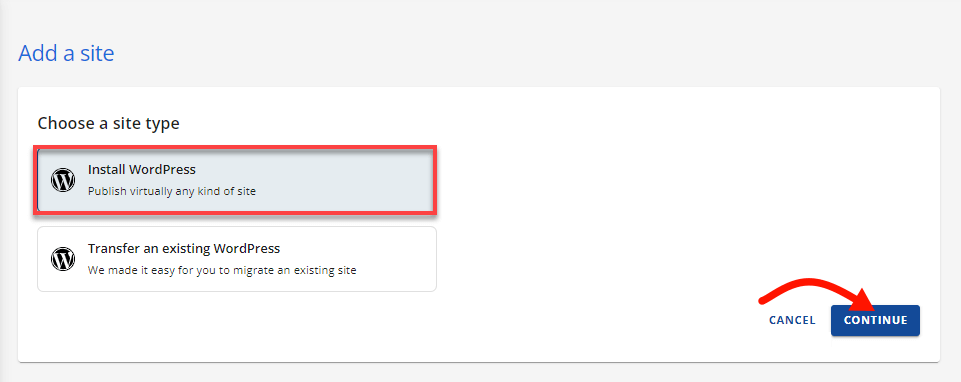
This action initiates the WordPress installation wizard. Select the “Install WordPress” option and proceed by clicking “Continue”.
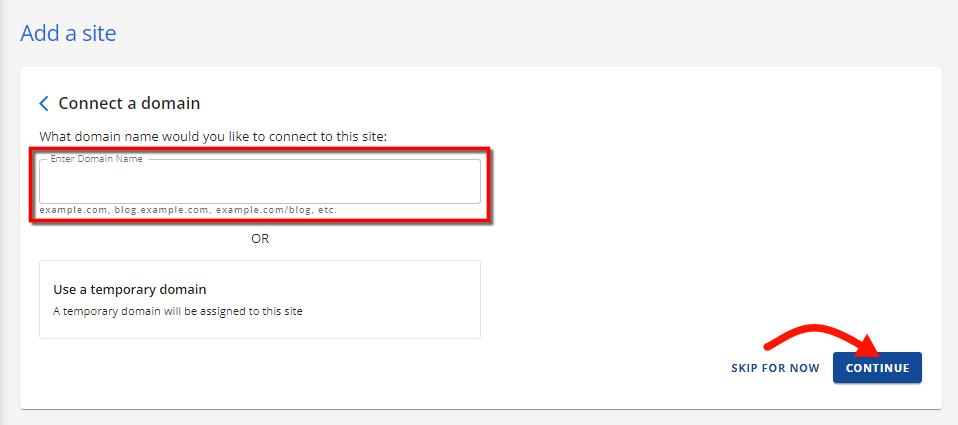
Enter your domain name in the Enter Domain Name field or select Use a temporary domain. Click “Continue” to proceed.
Bluehost will handle the rest, installing WordPress and creating your website. Once installation is complete, you’ll find your new website listed under the “Websites” tab.
To access your WordPress dashboard, simply click the “Edit Site” button. Alternatively, you can log in directly from your browser using yoursite.com/wp-admin/.

With Bluehost, you can create multiple websites using the same account. Just head to the Hosting section and utilize their one-click WordPress installer for each additional site.
Now that WordPress is set up, it’s your turn to add your personal touch to the design. Start by choosing a new template and creating some fresh pages.
Piece of cake, right? Let’s move on to the next step and select a theme for your website.
Step 3: Select Your Theme
As you start learning how to make a WordPress website, selecting the right WordPress theme is crucial. Your chosen theme will play a pivotal role in shaping the overall look and feel of your website, ensuring it reflects your unique brand identity.
Each WordPress site starts with a basic theme, which may not be very appealing to most users. But don’t worry. There are plenty of both free and paid WordPress themes available for you to choose from.
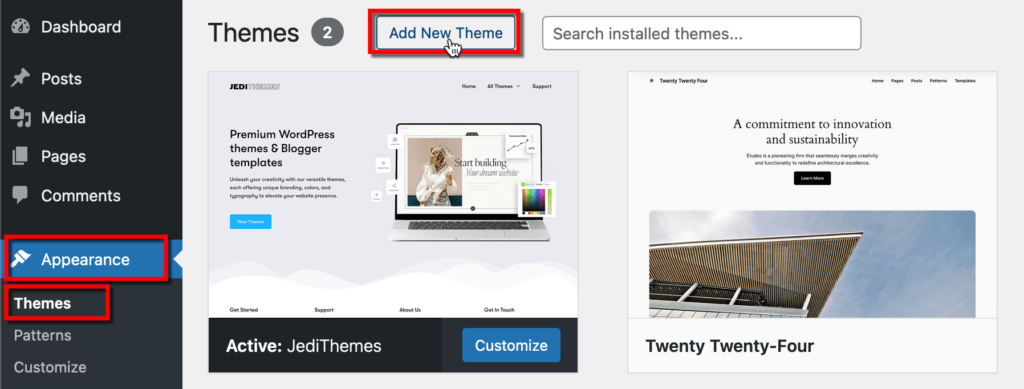
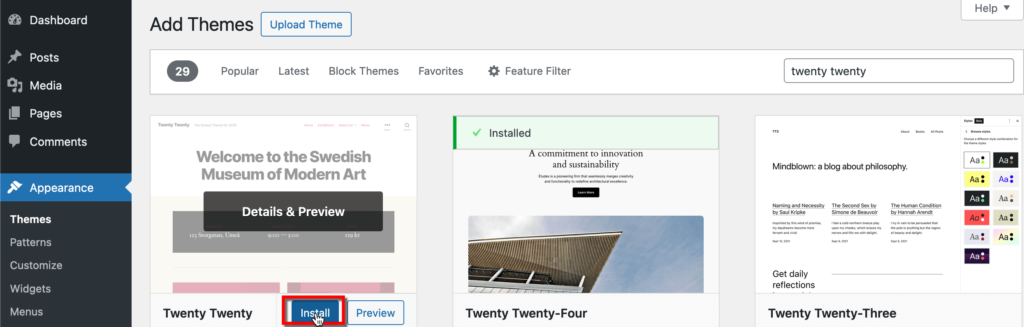
To change your WordPress theme, simply head to the admin dashboard and navigate to Appearance » Themes. From there, click the “Add New Theme” button.
You’ll be greeted with over 12,000 free WordPress themes from the official WordPress.org themes directory. Filter them by popularity, latest releases, features, and more to find the perfect fit for your site.
Need some inspiration? Check out our premium WordPress themes available on JediThemes.com.
How to Install a Theme in WordPress
If you’ve already got a specific free theme in mind, simply type its name into the search field within WordPress. Once you spot your desired theme in the search results, hover your mouse over it and click on the ‘Install’ button.
After the installation, head to the Appearance menu and click on ‘Customize‘ to start tailoring your theme to suit your preferences. This opens up the Customizer, allowing you to tweak settings while previewing changes live on your website.
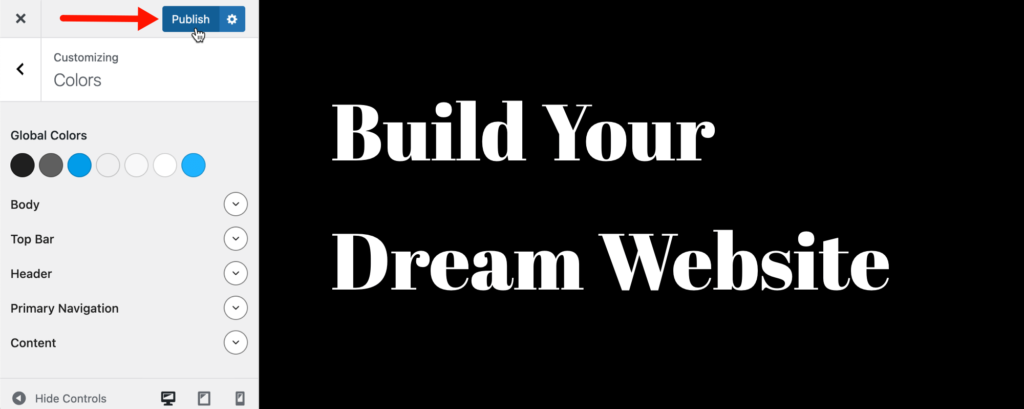
Remember, there’s no rush to finalize all theme settings immediately. It’s often best to refine customization once you’ve populated your website with some content.
Now, let’s explore how to add content to your WordPress site.
Step 4: Add Content to Your Website
Content is king, and WordPress empowers you to create engaging content effortlessly. In WordPress, there are two default content types: posts and pages.
Posts are ideal for dynamic, time-sensitive content, such as blogs, presented in reverse chronological order. On the other hand, pages are best suited for static content like your about section, contact information, privacy policy, or custom landing pages.
By default, WordPress sets your website’s front page to display a feed of blog posts. However, you have the flexibility to change this and set any static page as your homepage, a process we’ll cover later in this guide.
You can also create a separate page specifically for your blog or news section to showcase your recent posts. Alternatively, you can build a website without including a blog section at all.
Now, let’s start adding content to your website.
Begin by creating some pages for your WordPress site. Even if you don’t have all the content ready, you can always edit and update these pages later.
Navigate to Pages » Add New in your WordPress admin area. This will take you to the page editor screen, where you can provide a title for your page and add content using the text editor below. You can include text, links, images, videos, audio, and more.

Once you’ve added content, simply click the Publish button to make the page live on your website. Repeat this process to create additional pages for different sections of your site, such as an about page, contact page, or blog page to display your posts.
Next, let’s add some blog posts.
Go to Posts » Add New Post in your WordPress admin area, where you’ll find a screen similar to when adding pages. Here, you can add a title and content using the visual post editor. Additionally, you’ll see options in the sidebar for post formats, categories, and tags.
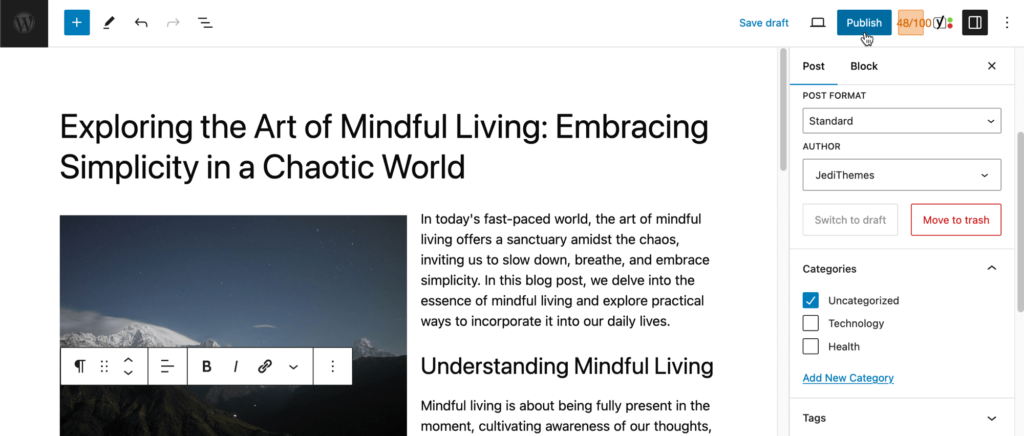
Once you’ve crafted your post, you can choose to save it as a draft using the Save Draft button or publish it immediately by clicking the Publish button.
Step 5: Customizing and Tweaking Your Website
Now that your website has some content, it’s time to give it a polished and professional appearance for your visitors.
First, let’s set up a static front page, also known as a homepage. This could be a very useful change when learning how to make a WordPress website.
Setting Up a Static Front Page
Navigate to the Settings » Reading page within your WordPress admin dashboard. Under the ‘Your homepage displays’ option, opt for ‘A static page’ and then designate the pages you previously created for your home and blog pages.
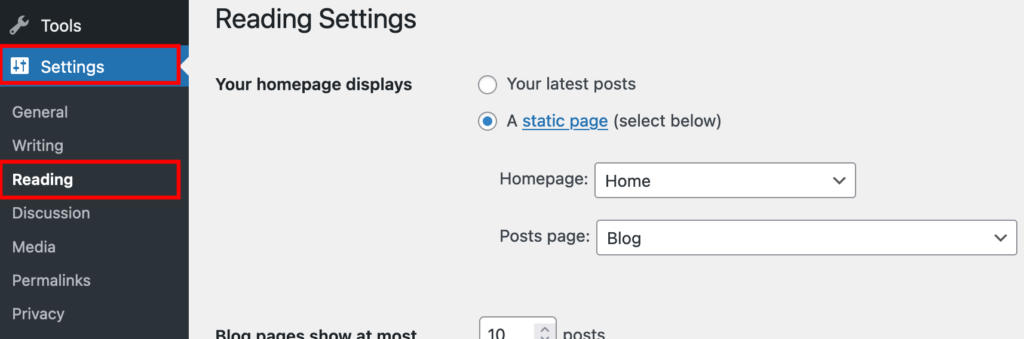
Remember to click the ‘Save Changes’ button at the bottom of the page to apply your modifications.
In the example above, our demo website will use a page titled ‘Home’ as its front page and the ‘Blog’ page to showcase blog posts.
Change Your Site Title and Tagline
During the setup process, you selected your site’s title. Optionally, you can also include a brief tagline to succinctly describe your website.
You can adjust your site’s title and tagline anytime by visiting the Settings » General page.
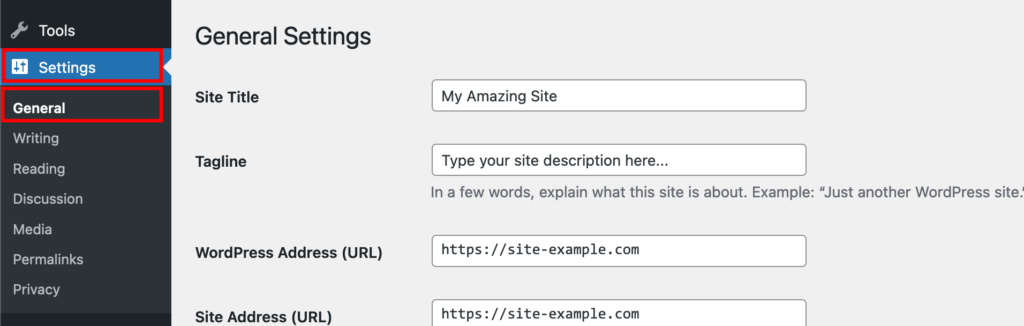
Your site title serves as the name of your website, such as “JediThemes.” The tagline is typically a single line that describes your website’s purpose.
Note: if you’re using WordPress SEO plugins like Yoast SEO, AIOSEO, and others, you can leave the tagline field blank as they will override it to enhance search engine optimization.
Don’t forget to save your changes by clicking the corresponding button.
Set up Comments Settings
WordPress includes a built-in comment system that enables users to leave comments on your posts. While this is great for user engagement, it’s also a target for spammers.
To combat this, you’ll want to enable comment moderation on your site.
Head to the Settings » Discussions page and scroll down to the ‘Before a comment appears’ section. Check the box next to the ‘Comment must be manually approved’ option.
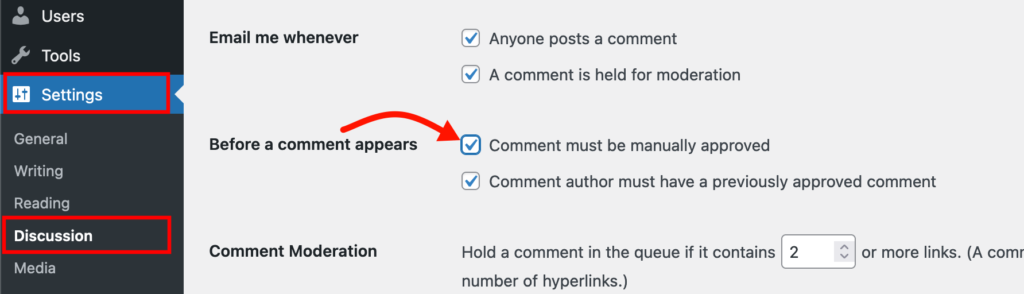
Remember to save your settings.
Adding Navigation Menus in WordPress
Navigation menus make it easy for visitors to navigate through various pages and sections of your website. WordPress utilizes a robust menu system, which is integrated into your theme to showcase these menus effectively.
To set up a navigation menu, head to the Appearance » Menus page.

Enter a name for your navigation menu and click the ‘Create Menu’ button.
WordPress will now generate an empty navigation menu. Select the pages you wish to include in your menu and click ‘Add to Menu.’
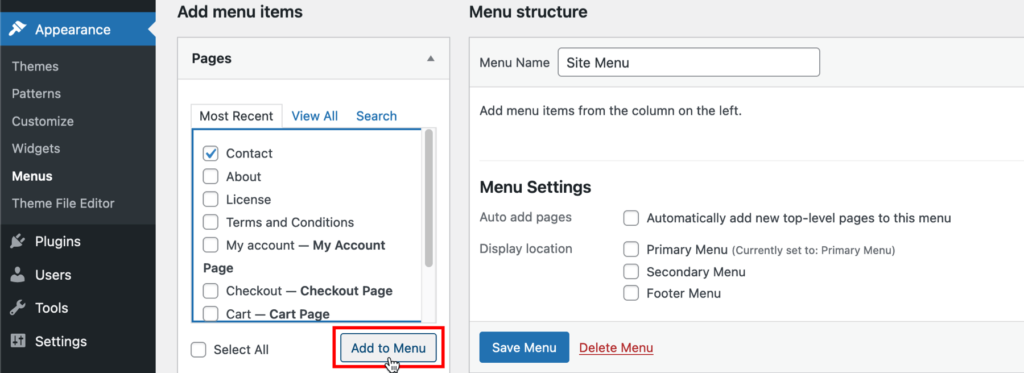
You can rearrange the menu items by dragging them up or down.
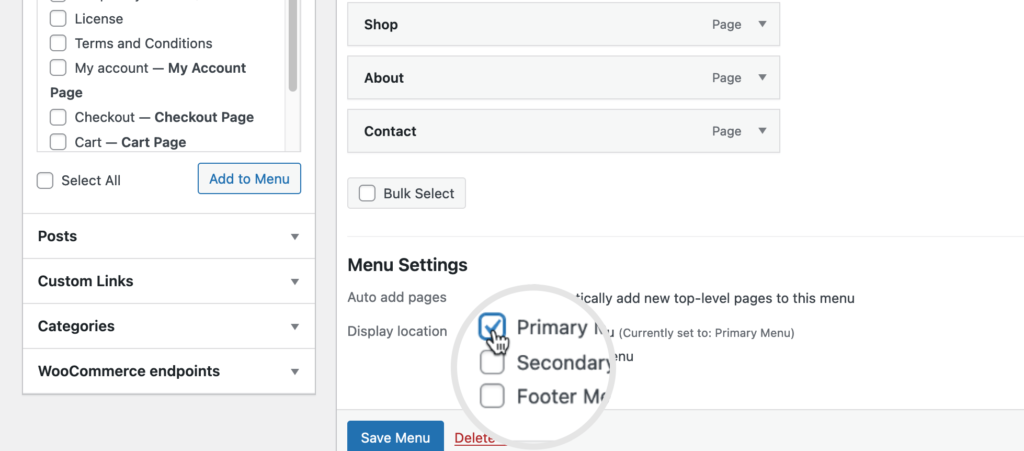
Next, you’ll need to choose a display location, which is determined by your WordPress theme. Typically, most themes feature a primary menu in the website header at the top.
Once you’ve made your selection, click the “Save Menu” button to save your settings.
Step 6: Installing Plugins in WordPress
Plugins are like magic tools for your WordPress site, adding all sorts of cool features and options. They cover a wide range of features, from contact forms to photo galleries, offering endless possibilities for customization.
Installation of plugins is straightforward through your WordPress dashboard, accessible on the Plugins » Add New Plugin page.
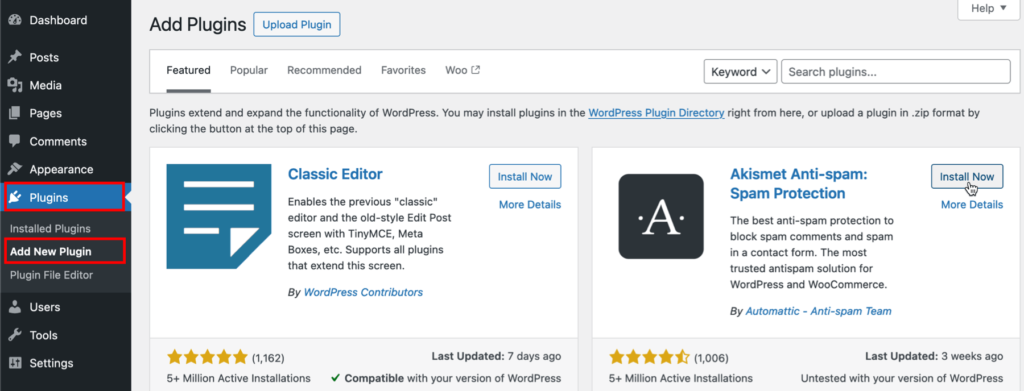
There are tons of free plugins out there, over 59,000 to be exact, plus some fancy ones you can buy. With so many choices, it can be overwhelming. But don’t worry, we’ve got you covered with a list of must-have plugins for your WordPress website.
- SEO: Optimize your site’s visibility with a robust SEO plugin like RankMath, enabling easy configuration of on-page and off-page SEO factors to improve your search engine ranking.
- Security: Prioritize your site’s protection by integrating a reliable security plugin like Sucuri to safeguard against malware and unauthorized access.
- Optimization: Maintain your site’s speed and efficiency by installing speed optimization and database cleaning plugins to ensure smooth operation in the long run.
- Caching: Enhance your site’s performance with a caching solution like WP Fastest Cache, ensuring fast loading times and improved user experience.
Optional Plugins to Consider
In addition to essential plugins, here’s a selection of additional plugins you might find useful for your WordPress website. While the essential plugins cover the basics, these optional ones add extra functionalities tailored to specific needs:
- Chat: Enhance customer engagement by integrating a chat plugin like HubSpot, offering a personalized touch to your interactions beyond traditional emails.
- Affiliate Marketing: Monetize your website effectively with an affiliate marketing plugin, opening up opportunities for generating passive income.
- Advertising: Boost your revenue streams by incorporating an advertising plugin, allowing you to manage and track ads efficiently for enhanced online sales.
- Social Media: Leverage the power of social proof with a social media plugin like Smash Balloon, which not only enhances SEO but also fosters greater engagement and trust among your audience.
Step 7: Launching Your Website
The final and most exciting step in mastering how to make a WordPress website is launching it to the world. After configuring appearance, navigation, and content, it’s time to finalize the setup and go live. Here’s a checklist to ensure a seamless transition to your live website:
- Review Content: Verify the accuracy of all content, correct any errors, and ensure all links are functional.
- Optimization: Optimize images for faster loading times and enable caching mechanisms to improve site performance.
- Search Engine Visibility: Enable search engine indexing by unchecking the “discourage search engines” option in WordPress settings.
- SEO and Analytics: Set up Google Analytics, configure SEO elements for each page, and generate an HTML sitemap using an SEO plugin.
- Domain Connection: Point your domain to your new website and install an SSL certificate for secure browsing.
- Security: Update all plugins, themes, and WordPress core to the latest versions to strengthen security measures.
- Form Testing: Test all forms to ensure proper functionality and email deliverability.
- Backup: Create a backup of your website using a reliable backup solution to safeguard against data loss in case of emergencies.
With these essential steps completed, your WordPress website is fully prepared to go live and start captivating your audience. Now, it’s time to launch your site and showcase your content to the world!
Conclusion
Congratulations on starting your journey to learn how to make a WordPress website! With our guide and WordPress’s flexibility, you’re well-equipped to build an amazing site. Just keep learning and adjusting to what your audience wants, and your website will grow beautifully.
Ready to get started? Let’s build something extraordinary with WordPress!